
Plush Toy Stitching Explained: What to Specify and How to Verify It
Stitch density, seam allowance, needle and thread sizing, reinforcement points and pull-force requirements — written from the buyer’s side, so you know what to put in a tech pack and what to look for when the sample arrives.
Updated August 2026 · B2B production guide
Stitch density on a plush toy is a specification you set, not a default the factory applies. It is decided per design in the tech pack, balancing fabric weight, toy size and where the stress falls.
Direct answer: Specify four things: seam allowance (typically 5 mm, 3 mm on small toys), stitch density appropriate to the fabric weight, which points get reinforced, and the pull force critical seams must withstand. If you specify none of them, they drift between operators and between batches.
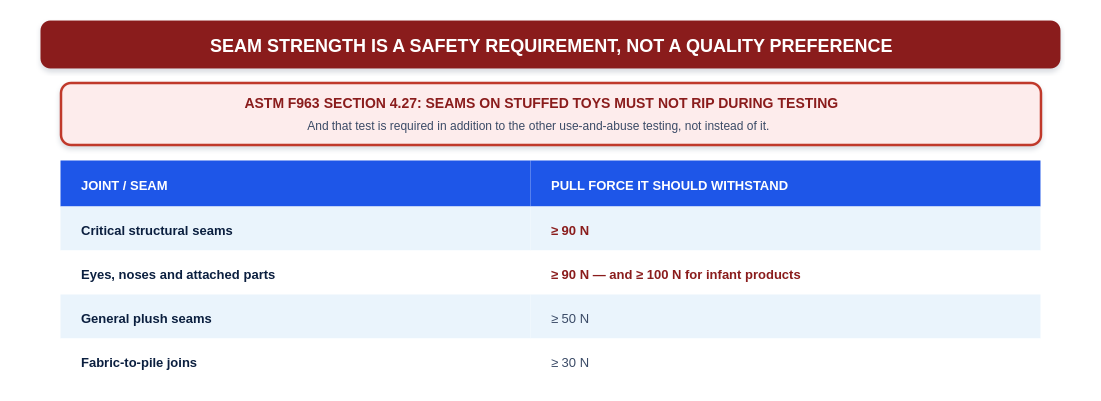
Plush Toy Stitching — TL;DR: Seam strength on a stuffed toy is a safety requirement rather than a finishing preference. ASTM F963 section 4.27 requires that seams on stuffed toys do not rip during testing, and that test is additional to the other use-and-abuse testing.
Scope: Figures below are our working parameters and the requirements we build to. Ranges vary by design, fabric and market — confirm applicable standards for your product with a testing laboratory. For the wider production sequence, see our
guide to how custom plush toys are made →.
Why Stitching Is a Safety Question First
Most articles on plush sewing treat stitching as craftsmanship — invisible closures, neat curves, premium finish. That matters, but it is the second-order concern.
The first-order concern is that a stuffed toy’s entire hazard profile changes if a seam opens. Fill escapes, anything sewn inside becomes accessible, and the product stops being contained. This is why ASTM F963 has a clause written specifically for stuffed and beanbag-type toys — section 4.27 — requiring that seams must not rip during testing, in addition to the general use-and-abuse testing every toy faces.
Translated into build requirements, that means specific pull forces. Critical structural seams should hold at least 90 N. Attached parts such as eyes and noses should hold at least 90 N, rising to at least 100 N on products intended for infants. General plush seams should hold at least 50 N, and fabric-to-pile joins at least 30 N. These are the numbers behind the sewing decisions, and they are what a stitch specification exists to deliver.
For how the standards themselves fit together, see our guide to toy safety standards →. Requirements referenced here align with ASTM F963 in the US, EN 71-1 in the EU, and China’s GB/T 9832 series.
The Parameters That Belong in Your Tech Pack
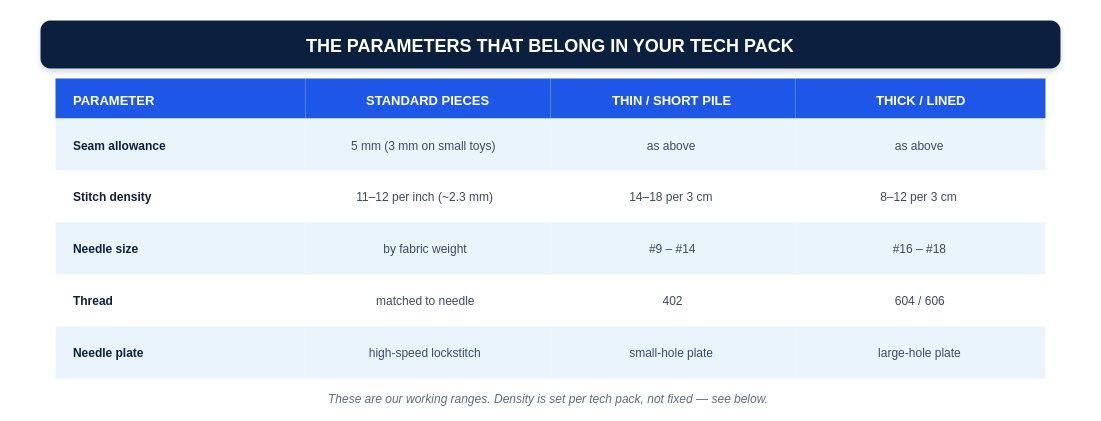
These are the working parameters we build to. They are not universal constants — a tech pack should state them for the specific product, which is exactly the point of this article.
Seam allowance. Around 5 mm on standard pieces and 3 mm on small toys, and — more importantly than the number — consistent. Uneven allowance is one of the most common causes of a distorted sample: limbs come out different sizes, faces sit off-centre. Curved and facial pieces are notched into the allowance so they lie flat once turned, without puckering.
Stitch density. Around 11 to 12 stitches per inch is a common baseline, roughly 2.3 mm per stitch. Thin fabrics such as short pile can go denser, in the range of 14 to 18 stitches per 3 cm. Thicker constructions — pile with a lining — run looser, around 8 to 12 per 3 cm. Density is also adjusted slightly on curves to stop the seam twisting.
Needle and thread. Matched to fabric weight rather than chosen once for the whole toy: lighter fabrics take a #9 to #14 needle with 402 thread, heavier constructions a #16 to #18 needle with 604 or 606 thread. Needle plates are changed to suit — small-hole for thin fabric, large-hole for thick.
Stitch quality. Flat stitching, no skipped stitches, no floating thread, and backtacking at the start and end of every seam to lock it.
More Stitches Is Not Better
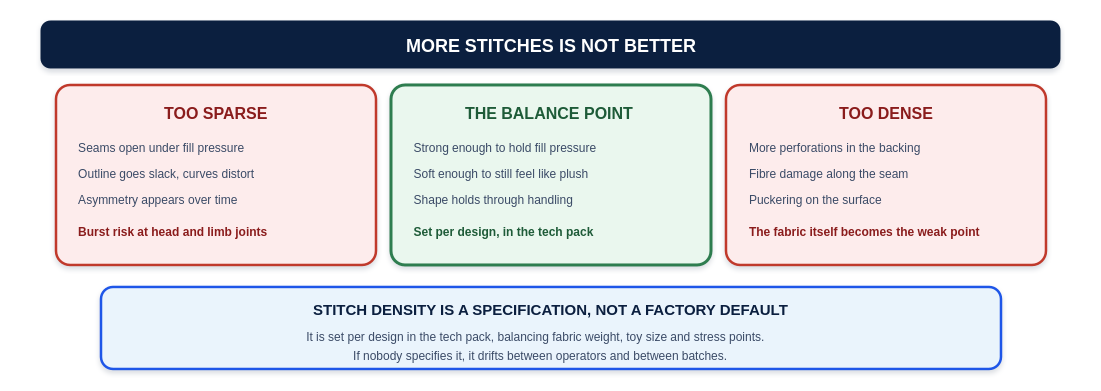
It is tempting to assume denser stitching always means a stronger toy. It doesn’t, and understanding why is what separates a useful specification from an arbitrary one.
Too sparse and the seam opens under sustained fill pressure. The stuffing inside a plush toy pushes outward continuously, so the failure is not usually sudden — the outline goes slack, curves distort, and the toy drifts out of symmetry before anything actually bursts. The head join, limb attachments and curved body panels take the most of this load.
Too dense and the fabric becomes the weak point instead of the thread. More stitches means more perforations through the backing, fibre damage along the seam line, and visible puckering on the surface. At that point adding stitching has made the product worse in both durability and appearance.
The target is the balance between the two, and it moves with fabric weight, toy size and where the stress falls. That is why it belongs in the tech pack per design rather than being left as a house default — and why asking a supplier what density they will use, and why, is a reasonable question.
Where Reinforcement Actually Goes
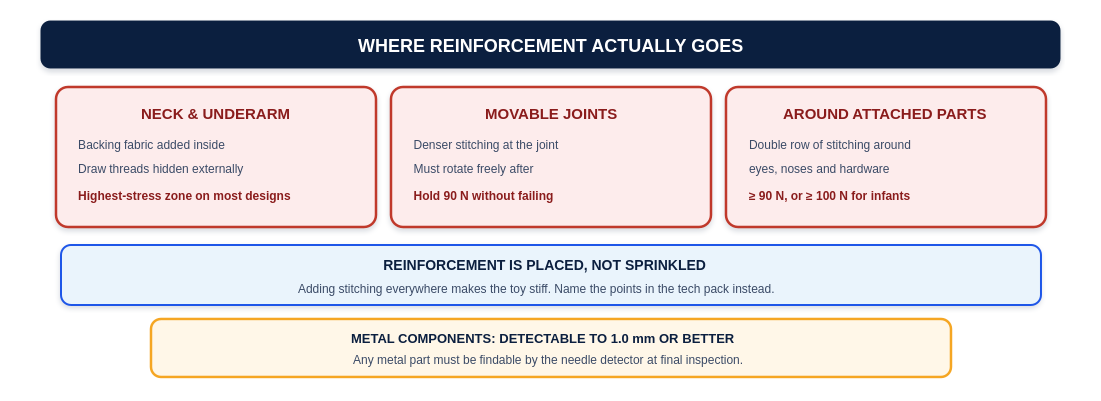
Reinforcement is placed, not sprinkled. Adding heavy stitching across the whole toy makes it stiff and expensive without improving the parts that actually fail.
Neck and underarm. The highest-stress zone on most character designs. These get an internal backing fabric, with the draw threads hidden so nothing shows externally.
Movable joints. Denser stitching at the joint, with the requirement that it still rotates freely afterwards and holds 90 N without failing. Both halves of that matter — a joint that passes the pull test but no longer moves is a failed design, not a passed one.
Around attached parts. A double row of stitching around eyes, noses and any hardware, meeting at least 90 N, or at least 100 N on infant products.
Any metal component should also be detectable at 1.0 mm or better, so that it can be distinguished at final inspection when finished goods pass through needle detection.
Two Details Specific to Pile Fabric
Two sewing problems exist on plush that simply don’t arise on flat fabric, and both are worth knowing because neither is fixable after the fact.
Trapped pile. As the seam is sewn, the pile has to be pushed back into the seam so it isn’t caught in the stitch line. Fibre that gets trapped leaves a bald stripe along the join — visible, permanent, and not correctable once the toy is assembled. On long-pile fabrics this is a significant part of the sewing labour.
Curve handling. Curved sections are eased and fed rather than pulled through, so that after stuffing the shape reads as round rather than developing a hard corner. This is where operator skill shows most clearly, and it is why complex designs get assigned to experienced sewers rather than being distributed evenly across a line.
Alignment sits alongside both. Registration marks for limbs and ears have to line up, the head and body centre lines have to meet, and the nap must run the same way across pieces. Get these wrong and no amount of stitch quality rescues the result.
What to Check When the Sample Arrives
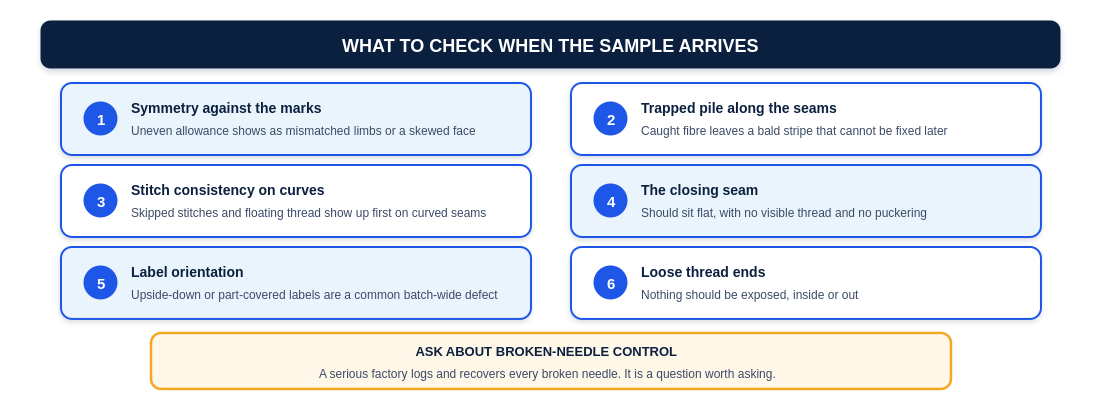
A stitch specification is only worth what your inspection of the sample confirms. Six checks catch most of what goes wrong, and none of them need equipment.
Beyond the sample itself, one process question is worth asking any supplier: how do they handle broken needles? A factory running to standard logs and recovers every broken needle, keeps work-in-progress separated to prevent contamination, and checks that no metal fragment or loose thread end remains. It is a small question that tells you a lot about whether the quality system is real.
Our own approach to in-line and final checks is on the quality control process → page.
Frequently Asked Questions
What stitch density should a plush toy use? There is no single correct number. A common baseline is 11 to 12 stitches per inch, with thin fabrics running denser (around 14 to 18 per 3 cm) and thicker constructions looser (around 8 to 12 per 3 cm). It should be specified per design in the tech pack rather than left to the factory.
What seam allowance is used on plush toys? Typically around 5 mm on standard pieces and 3 mm on small toys. Consistency matters more than the exact figure — uneven allowance distorts proportions across the finished toy.
How strong do plush toy seams need to be? Critical structural seams should withstand at least 90 N, attached parts at least 90 N (at least 100 N for infant products), general plush seams at least 50 N, and fabric-to-pile joins at least 30 N. Confirm the requirements applicable to your target market with a testing laboratory.
Why does my sample have a bald line along the seam? Pile has been caught in the stitch line. It has to be pushed clear as the seam is sewn, and once the toy is assembled it cannot be corrected — the piece has to be re-sewn.
Is hand stitching better than machine stitching? They do different jobs. Machine stitching builds the structure; hand stitching closes the stuffing opening and handles detail work machines can’t reach. Almost every plush toy uses both.
Can I just tell the factory to make it strong? You can, but you will get that factory’s interpretation rather than a defined outcome. Naming the seam allowance, the density range, the reinforcement points and the pull force gives you something to inspect against and something to hold a supplier to.
Terminology Buyers Should Know
Term | What It Means |
Stitch density | Stitches per unit length. Set per design in the tech pack, not a fixed factory standard |
Seam allowance | The margin between the stitch line and the cut edge — typically 5 mm, 3 mm on small toys |
Notching | Small cuts into the allowance on curves so the seam lies flat once turned |
Backing fabric | An internal reinforcing layer added at high-stress points such as the neck |
Backtack | Reverse stitching at the start and end of a seam to lock the thread |
Pull force | The tensile load a seam or attached part must withstand without failing, measured in newtons |
Needle detection | Passing finished goods through a metal detector to catch broken needle fragments |
Trapped pile | Pile fibres caught in a seam, leaving a bald stripe along the join |
A Note on Scope
The parameters in this article are the working ranges and requirements we build to, provided so buyers can write a more complete specification. They are not universal standards: appropriate stitch density and seam allowance vary with fabric, design and product size, and different factories may work to different but equally valid figures. Pull-force and testing requirements differ by market and age grade — confirm what applies to your product with a qualified testing laboratory before production. Nothing here is a substitute for testing against the standard of your destination market.
References & Sources
1. U.S. Consumer Product Safety Commission — Toy Safety Business Guidance
2. eCFR — 16 C.F.R. part 1250, mandatory toy safety standard
3. European Commission — Toy Safety
Want a Stitch Specification Written for Your Design?
Send us your artwork and target market and we’ll come back with proposed seam allowance, density range and reinforcement points before sampling — so the first sample is built to something defined rather than to an assumption.