
Custom Plush Toys Explained: How They’re Designed and Made
A step-by-step look at how a custom plush toy actually gets made — covering design, the tech pack, plush toy sampling from sketch to prototype, bulk production, and the stages where projects most often go wrong.
Updated August 2026 · B2B production guide
A custom plush toy is made in two distinct phases: a design phase that ends with an approved physical sample, and a production phase that reproduces that sample at volume.
Direct answer: The design phase is where the product is decided — artwork becomes a tech pack, a pattern maker turns that into a 3D shape, and sampling iterates until it’s right. Production then repeats that approved sample across a full order.
Custom Plush Toys Explained — TL;DR: Most of the risk sits in the translation from a flat drawing to a stitched three-dimensional object. Specifications written in numbers rather than adjectives are what keep that translation predictable.
Scope: This article covers the process. For what “custom” means, MOQ ranges and material options, see our complete guide,
linked at What Is a Custom Plush Toy? →. Timings and fees below are typical industry ranges and vary by design complexity, factory and season.
The Two Halves: Design and Production
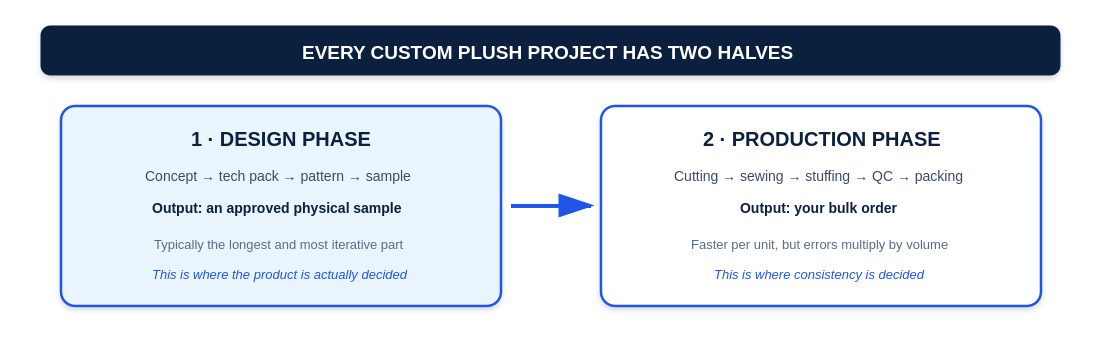
It helps to think of a custom plush project as two separate problems rather than one long queue of steps. The design phase answers “can this be made, and does it look right?” Its output is a single approved physical sample. The production phase answers a completely different question: “can this be made the same way, several thousand times?”
Buyers who treat these as one process tend to underestimate the first half and over-trust the second. In practice the design phase takes most of the calendar time and almost all of the back-and-forth, while the production phase is where consistency, cost and compliance are actually determined.
Why a Drawing Isn’t Enough: The 2D to 3D Problem
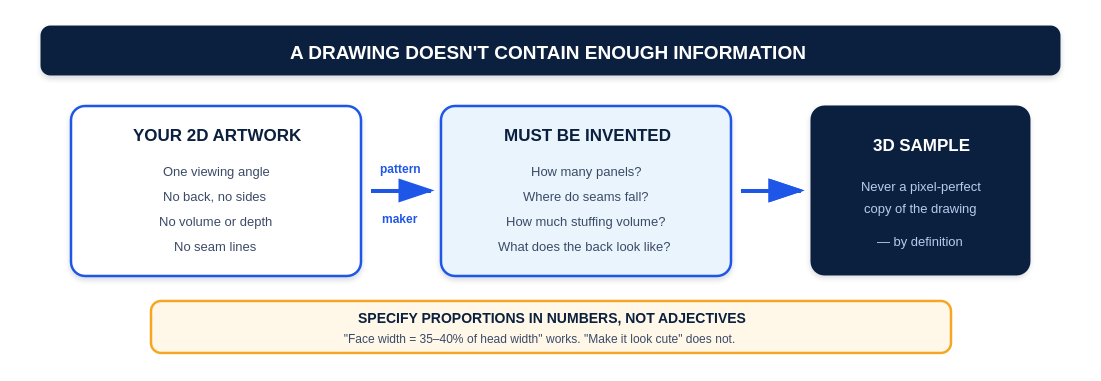
This is the single most misunderstood part of custom plush, and the reason first samples so often disappoint.
A piece of artwork shows one viewing angle. It has no back, no sides, no volume, and no seam lines. None of that information exists in the file you send. A pattern maker has to invent it: how many fabric panels the head needs to hold a round shape, where the seams can fall without cutting through a face, how much internal volume the body needs to look full rather than flat.
That invention step is why a 3D sample is never a pixel-perfect copy of a 2D drawing — not because the factory got it wrong, but because the drawing never specified those things in the first place. A flat illustration of a round, chubby character can easily come back looking thin, because “round and chubby” is a visual impression, not a measurement.
The practical fix is to state proportions numerically. “Face width should be 35–40% of head width” is something a pattern maker can build to. “Make it look cute like the picture” is not. The more of the design intent you can express as ratios and dimensions, the fewer revision rounds you will pay for.
What Goes Into a Tech Pack
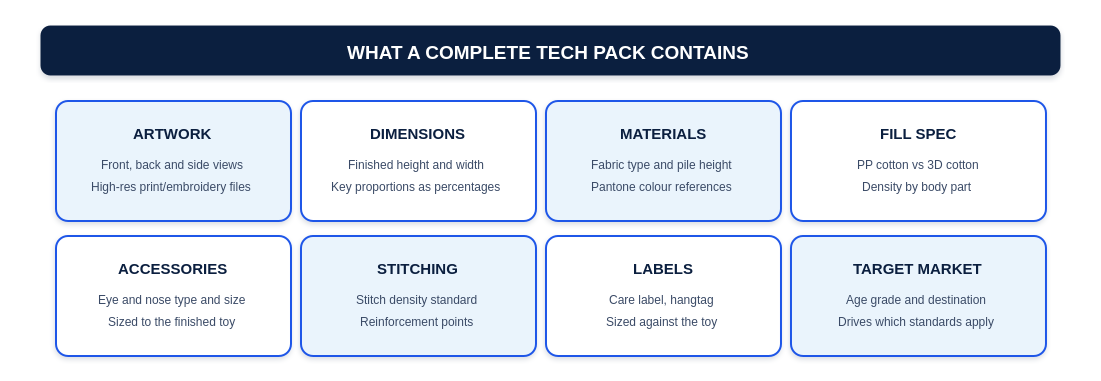
A tech pack is the specification a factory quotes and builds from. Incomplete tech packs are the most common cause of surprise costs, because every gap becomes an assumption someone else makes on your behalf.
At minimum it should cover artwork from multiple angles with high-resolution files for any print or embroidery, finished dimensions with key proportions expressed as percentages, fabric type and pile height with Pantone colour references, fill specification including density by body part, accessory types and sizes matched to the finished toy, stitching standards and reinforcement points, labelling requirements, and the target age grade and destination market — the last of which determines which safety standards apply.
Material choice matters more than buyers expect. PP cotton holds a structured, upright shape; 3D cotton gives a softer, squishier hand-feel. Which one you pick changes how the finished toy reads in the hand. See our fabric options → and accessories → references for the range available.
Plush Toy Sampling Explained: From Sketch to Prototype
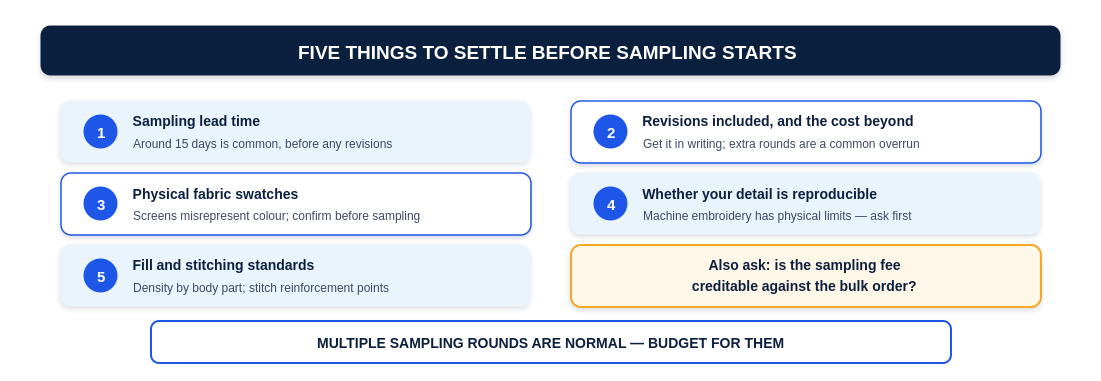
Sampling is not a formality before production — it is the design process. The factory’s pattern maker builds a single unit by hand, you review it, and the two of you iterate until it’s approved. A first sample commonly takes around fifteen days, before any revision rounds are counted.
Five things are worth settling in writing before that clock starts: the sampling lead time, how many revisions are included and what further rounds cost, whether physical fabric swatches can be sent before sampling begins, whether your more complex details are actually reproducible, and the fill and stitching standards the factory will work to. It’s also worth asking whether the sampling fee is creditable against the bulk order — many factories will credit it once you reach the minimum quantity.
Two habits make sampling go faster. First, confirm colour from physical swatches rather than a screen, since monitors misrepresent fabric colour badly and dye lots vary. Second, give feedback in specific terms. “The head should be 10% wider” produces a useful revision; “make it cuter” produces another round of guesswork that you will probably pay for.
Inside Production: The Full Line
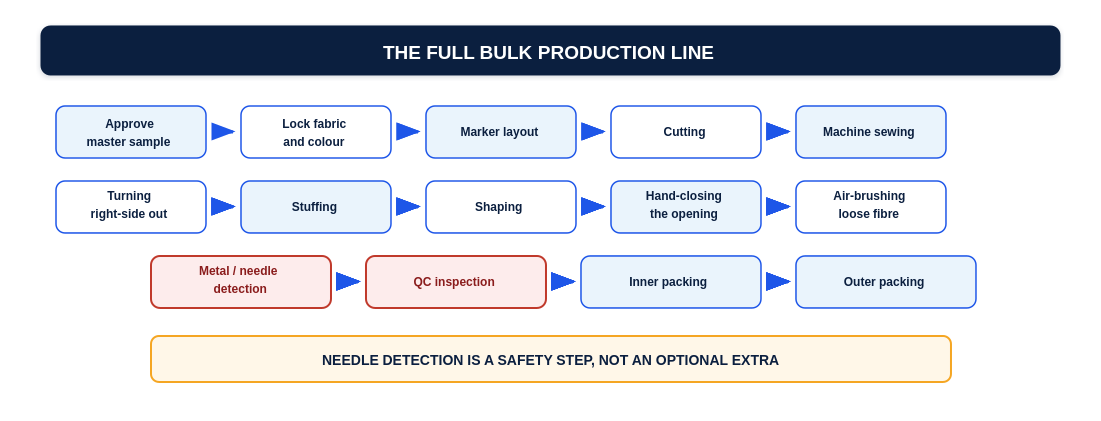
Once a master sample is approved, bulk production runs through a longer sequence than most buyers realise. Fabric and colour are locked against the approved sample, pattern pieces are arranged in a marker layout to minimise waste, and the fabric is cut. Panels are machine-sewn into a shell, which is then turned right-side out, stuffed, shaped, and hand-closed at the stuffing opening — that final closure is hand work on almost every plush toy, which is one reason plush is more labour-intensive than it looks.
The finishing sequence is where quality is visibly won or lost. Toys are air-brushed to lift the pile and remove loose fibre, then passed through metal and needle detection to catch any fragment of a broken sewing needle, then QC inspected before inner and outer packing.
Needle detection deserves particular attention: it is a safety step, not a finishing nicety, and it is one of the things worth confirming a supplier actually runs on every unit. Our quality control process → page covers how we handle this stage.
Where Projects Actually Go Wrong
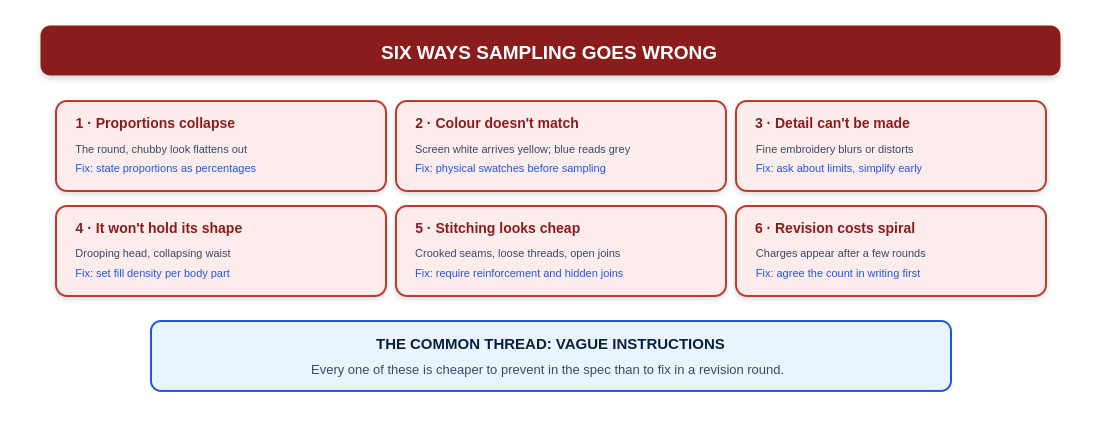
Across projects, the same six problems account for most sampling frustration — and all six are cheaper to prevent in the specification than to correct in a revision round.
Proportions collapse. The round silhouette in the artwork comes back flat or thin. Prevent it by expressing key proportions as percentages rather than describing the look.
Colour doesn’t match. A soft off-white reads yellow in the fabric; a muted blue reads grey. Prevent it by approving physical swatches, not screen colours, and by confirming the dye lot.
Detail can’t be reproduced. Machine embroidery has physical limits — very fine or asymmetric patterning can blur or distort at small scale. Ask what’s achievable before sampling, and simplify early rather than paying to discover it.
The toy won’t hold its shape. Drooping heads and collapsing waists come from uniform stuffing. Specify density by body part: firmer through the head to keep structure, softer through the body for hand-feel, with reinforcement at load-bearing points.
Stitching looks cheap. Crooked seams, visible thread ends and unhidden joins undermine an otherwise good design. Specify reinforcement, hidden joins and trimmed threads as requirements, then inspect the sample for exactly those things.
Revision costs spiral. Charges commonly appear once you pass the included revision count. Agree the number and the cost of extras in writing before sampling begins.
Sample Approved Is Not the Same as Bulk Approved
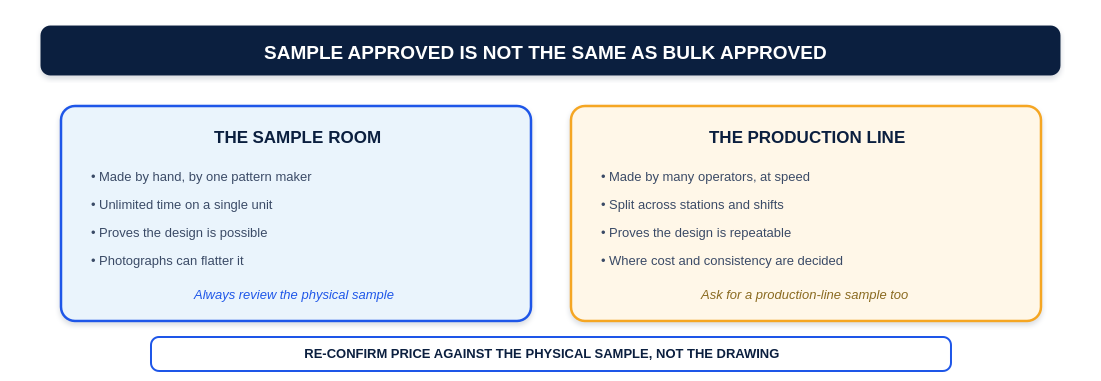
This distinction catches out a lot of first-time buyers. A sample is made by hand, by one skilled pattern maker, with effectively unlimited time on a single unit. It proves the design is possible. Bulk production is made by many operators working at speed across separate stations — it proves the design is repeatable, which is a different claim entirely.
For designs with fine detail or tight quality requirements, it’s worth asking for a production-line sample in addition to the sample-room one, specifically to catch problems that only appear at line speed. Two further habits are worth adopting: always review the physical sample rather than photographs, since images flatter, and re-confirm pricing against the approved physical sample rather than the original drawing, because quoting from artwork and quoting from a finished object often produce different numbers.
Minor changes — removing a highlight from an eye, adjusting a fabric colour reference — can sometimes be absorbed at the production-sample stage rather than triggering another full sampling round, which is useful when a launch date is tight.
A Realistic Timeline
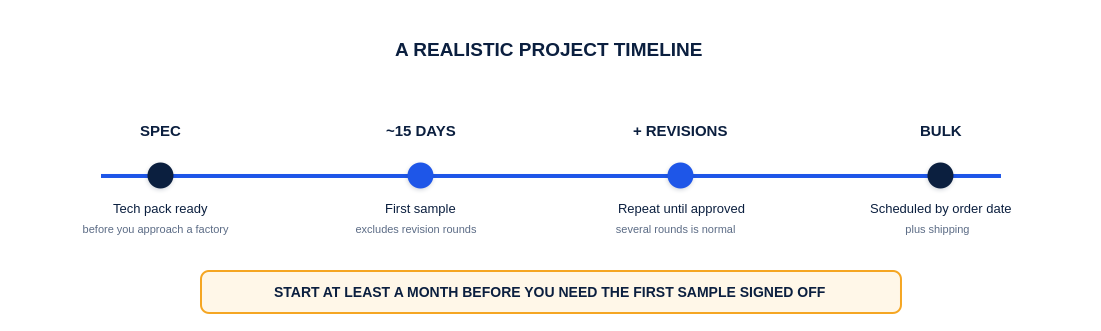
Working backwards from a launch date is the safest way to plan. Have the tech pack finished before you approach a factory. Allow roughly fifteen days for a first sample, then additional time for however many revision rounds the design needs — multiple rounds are normal, not a sign that something has gone wrong. Bulk production is scheduled from the date the order is placed, and shipping time sits on top of that.
A practical rule: start at least a month before you need a first sample signed off, and considerably earlier if the design is complex or the launch date is fixed.
Frequently Asked Questions
How long does it take to make a custom plush toy? A first sample commonly takes around fifteen days, excluding revisions. Bulk production is scheduled after sample approval and varies by quantity and factory workload, with shipping on top. Plan in months rather than weeks.
How much does sampling cost? Sampling fees vary widely by complexity — commonly a few hundred RMB for straightforward designs (roughly US$70–200), higher for complex ones. Ask whether the fee is creditable against the bulk order.
Why doesn’t my sample look exactly like my drawing? Because a 2D drawing doesn’t contain the information needed to build a 3D object — panel count, seam placement and internal volume all have to be interpreted. Specifying proportions numerically narrows that gap substantially.
How many sampling rounds should I expect? Several is normal. Many factories include two or three revisions in the sampling fee; confirm the number and the cost of additional rounds before starting.
Can I skip sampling to save time? It isn’t advisable. Bulk production is measured against an approved master sample, so without one there is no agreed reference for what “correct” means if a dispute arises.
Terminology Buyers Should Know
Term | What It Means |
Tech pack | The specification document a factory works from: artwork, dimensions, materials, fill, stitching and labelling |
Pattern | The flat template that turns 2D artwork into a 3D stitched shape |
Marker layout | Arranging pattern pieces on fabric to minimise waste before cutting |
Master sample | The approved reference unit all bulk production is measured against |
Production-line sample | A unit made on the actual line rather than in the sample room |
Needle detection | Passing finished toys through a metal detector to catch broken needle fragments |
PP cotton / 3D cotton | Two common fills: PP holds structure, 3D gives a softer hand-feel |
A Note on Scope
Timings, fees and process details in this article are typical industry ranges intended to help buyers plan. They vary by design complexity, factory, order size and season, and should be confirmed with your supplier for any specific project. Safety testing and compliance requirements are separate from the production process described here and depend on your target market.
Ready to Start a Custom Plush Project?
If you have artwork and want to know what it would take to build, our team can review your design, flag anything that may be difficult to reproduce, and walk you through sampling before you commit.